��������iOS����Ա���Ϲ�GitHubѰ�ҿ�Դ��⣬��ȷ��GitHub���д�������Ŀ�Դ�����ѧϰ�����������Xcode���ϴ�������GitHub�أ�
��ʼ֮ǰ�Ȱ�װgit
��Դ���밲װ
����������������Դ���밲װ�кܶ�ô������ٿ���װ���µİ汾��Git ��ÿ���汾���ڲ��ϳ��ԸĽ��û����飬������ͨ��Դ�����Լ����밲װ���°汾���ٺò����ˡ���Щ Linux �汾�Դ��İ�װ����������������ʱ�����Գ������������µ� distro ���� backports����ô��Դ���밲װ��ʵ���������ѡ��
Git �Ĺ�����Ҫ���� curl��zlib��openssl��expat��libiconv �ȿ�Ĵ��룬������Ҫ�Ȱ�װ��Щ�������ߡ����� yum ��ϵͳ�ϣ����� Fedora�������� apt-get ��ϵͳ�ϣ����� Debian ��ϵ������������������װ��
$ yum install curl-devel expat-devel gettext-devel \
    openssl-devel zlib-devel

    $ apt-get install libcurl4-gnutls-dev libexpat1-dev gettext \
    libz-dev libssl-dev
֮������� Git �ٷ�վ���������°汾Դ���룺
http://git-scm.com/download
Ȼ����벢��װ��
$ tar -zxf git-1.7.2.2.tar.gz
    $ cd git-1.7.2.2
    $ make prefix=/usr/local all
    $ sudo make prefix=/usr/local install
�����Ѿ������� git �����ˣ��� git �� Git ��Ŀ�ֿ��¡�����أ��Ա��պ���ʱ���£�
$ git clone git://git.kernel.org/pub/scm/git/git.git
�� Mac �ϰ�װ
�� Mac �ϰ�װ Git �����ַ�ʽ�������ĵ���ʹ��ͼ�λ��� Git ��װ���ߣ�������ͼ 1-7�����ص�ַ�ڣ�
http://code.google.com/p/git-osx-installer
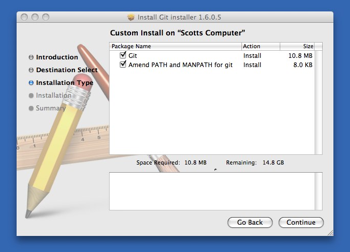
ͼ 1-7. Git OS X ��װ����
��һ����ͨ�� MacPorts (http://www.macports.org) ��װ������Ѿ�װ���� MacPorts������������װ Git��
$ sudo port install git-core +svn +doc +bash_completion +gitweb
���ַ�ʽ�Ͳ���Ҫ���Լ���װ�������ˣ�Macports �����㶨��Щ�鷳�¡�һ�������г��İ�װѡ���Ѿ����ã�Ҫ�������� Git ���� Subversion �Ĵ���ֿ⣬�����Լ��� +svn ѡ����彫�ڵڰ��������ܡ�����ע������һ����ʹ�� homebrew��https://github.com/mxcl/homebrew����brew install git����
��ʼ
���������½�һ�����̣��ǵ�Ҫ��ѡCreate git repository on:

��˵��ʹ��Source Control����Ĭ���ڹ����д���git repository��Ȼ���½���ɺ����Ҳ����������Щ��Ϣ��˵���Ѿ�����Source Control

���û��ʹ��Source Control�����������ģ�

���������Ѿ��ڹ�����������Source Control�������Ϳ���ʹ��git���������̰汾��
��������������һ��δ����git�Ĺ��̼���git�Ĺ�����ô���أ����ǿ���ʹ���������������˹��ܣ��½�һ�����̣�����ѡCreate git repository on����ʱ����û�п���Source Control��Ȼ�������ֶ�����git����������ͼ��ʾ��
YiBantekiiMac-3:UseGit YiBan$ cd /Users/YiBan/Documents/iOS_Dev/ManualGitDemo
YiBantekiiMac-3:ManualGitDemo YiBan$ git init
Initialized empty Git repository in /Users/YiBan/Documents/iOS_Dev/ManualGitDemo/.git/
ʹ��
git init
����ʼ��һ���յ�git�ֿ⣬����ʹ��ls-la����鿴Ŀ¼�µ������ļ������������ļ���
total 16
drwxr-xr-x   7 YiBan  staff   238  5 12 16:10 .
drwxr-xr-x  52 YiBan  staff  1768  5 12 16:06 ..-rw-r--r--@  1 YiBan  staff  6148  5 12 16:10 .DS_Store
drwxr-xr-x   9 YiBan  staff   306  5 12 16:06 .git
drwxr-xr-x  12 YiBan  staff   408  5 12 16:06 ManualGitDemo
drwxr-xr-x   5 YiBan  staff   170  5 12 16:06 ManualGitDemo.xcodeproj
drwxr-xr-x   5 YiBan  staff   170  5 12 16:06 ManualGitDemoTests
��ʱ���ǿ������������ļ�֮������������ļ���.DS_Store��.git��.DS_Store����OS X���ɵ��ļ����������ļ����е�λ�����ԣ�.git����������Source Control�Զ����ɵ�Ŀ¼��Ȼ��ʹ��git status�鿴��ǰ״̬��
YiBantekiiMac-3:ManualGitDemo YiBan$ git status
On branch master

Initial commit

Untracked files:
  (use "git add <file>..." to include in what will be committed)

    .DS_Store
    ManualGitDemo.xcodeproj/
    ManualGitDemo/
    ManualGitDemoTests/nothing added to commit but untracked files present (use "git add" to track)
˵����ʼ���ɹ��ˣ���ʾ����δ���ٵ��ļ����������Dz���ϣ����.DS_StoreҲ�����git�У���Ϊ���ļ�������û���κ��ô������ǿ��Ժ����������������ǣ��½�һ���ļ�������Ϊ.gitignore��Ȼ��ʹ���ı��༭������������Ϣ��
# Xcode

.DS_Store

*/build/*

*.pbxuser
!default.pbxuser
*.mode1v3
!default.mode1v3
*.mode2v3
!default.mode2v3
*.perspectivev3
!default.perspectivev3
xcuserdata
profile
*.moved-aside
DerivedData
.idea/
*.hmap
�����������ļ����У���������Ŀ¼�оͶ��һ��.gitignore�ļ��ˣ���ʱ��������git status����鿴��ǰ״̬��
YiBantekiiMac-3:ManualGitDemo YiBan$ git status
On branch master

Initial commit

Untracked files:
  (use "git add <file>..." to include in what will be committed)

    .gitignore
    ManualGitDemo.xcodeproj/
    ManualGitDemo/
    ManualGitDemoTests/

nothing added to commit but untracked files present (use "git add" to track)
������Ѿ�û��.DS_Store�ˣ�˵��.gitignore�Ѿ���.DS_Store�����ˡ����ڿ����ύ�ˣ�ʹ��
git add .
�������Ƚ��ļ��������ݴ�������û���ύ���鿴��״̬��
YiBantekiiMac-3:ManualGitDemo YiBan$ git status
On branch master

Initial commit

Changes to be committed:
  (use "git rm --cached <file>..." to unstage)

    new file:   .gitignore
    new file:   ManualGitDemo.xcodeproj/project.pbxproj
    new file:   ManualGitDemo.xcodeproj/project.xcworkspace/contents.xcworkspacedata
    new file:   ManualGitDemo/AppDelegate.h
    new file:   ManualGitDemo/AppDelegate.m
    new file:   ManualGitDemo/Base.lproj/Main.storyboard
    new file:   ManualGitDemo/Images.xcassets/AppIcon.appiconset/Contents.json
    new file:   ManualGitDemo/Images.xcassets/LaunchImage.launchimage/Contents.json
    new file:   ManualGitDemo/ManualGitDemo-Info.plist
    new file:   ManualGitDemo/ManualGitDemo-Prefix.pch
    new file:   ManualGitDemo/ViewController.h
    new file:   ManualGitDemo/ViewController.m
    new file:   ManualGitDemo/en.lproj/InfoPlist.strings
    new file:   ManualGitDemo/main.m
    new file:   ManualGitDemoTests/ManualGitDemoTests-Info.plist
    new file:   ManualGitDemoTests/ManualGitDemoTests.m
    new file:   ManualGitDemoTests/en.lproj/InfoPlist.strings
���ڽ����ύ��ʹ��git commit -m "Initail"��������ڵ��������ύ��ע�ͣ����дʲô�����ԣ�
YiBantekiiMac-3:ManualGitDemo YiBan$ git commit -m "Initial"[master (root-commit) 83bbefc] Initial 17 files changed, 803 insertions(+)
 create mode 100644 .gitignore
 create mode 100644 ManualGitDemo.xcodeproj/project.pbxproj
 create mode 100644 ManualGitDemo.xcodeproj/project.xcworkspace/contents.xcworkspacedata
 create mode 100644 ManualGitDemo/AppDelegate.h
 create mode 100644 ManualGitDemo/AppDelegate.m
 create mode 100644 ManualGitDemo/Base.lproj/Main.storyboard
 create mode 100644 ManualGitDemo/Images.xcassets/AppIcon.appiconset/Contents.json
 create mode 100644 ManualGitDemo/Images.xcassets/LaunchImage.launchimage/Contents.json
 create mode 100644 ManualGitDemo/ManualGitDemo-Info.plist
 create mode 100644 ManualGitDemo/ManualGitDemo-Prefix.pch
 create mode 100644 ManualGitDemo/ViewController.h
 create mode 100644 ManualGitDemo/ViewController.m
 create mode 100644 ManualGitDemo/en.lproj/InfoPlist.strings
 create mode 100644 ManualGitDemo/main.m
 create mode 100644 ManualGitDemoTests/ManualGitDemoTests-Info.plist
 create mode 100644 ManualGitDemoTests/ManualGitDemoTests.m
 create mode 100644 ManualGitDemoTests/en.lproj/InfoPlist.strings
�ٲ鿴��״̬��
YiBantekiiMac-3:ManualGitDemo YiBan$ git status
On branch master
nothing to commit, working directory clean
���ˣ���ǰ�������Ǹɾ��ģ����붼�Ѿ��ύ����ˡ����ǿ�����Xcode�ύ���룬Ҳ�������������ύ�������������еĻ����������������һЩ��ʹ��Xcode���Բ鿴�ύ����ʷ��¼,Source Control->History:

���ӹ�����GitHub
���ȱ�����GitHub���ʺţ�û�еĻ�ȥע��һ�������һ�Ҫ����SSH��GitHubʹ���˹�˽��Կ��ȷ������ĵ���ͨѶ�����ǰ�ȫ�ġ�
SSH���������������ģ�
1. ������������cd ~/.ssh��Ȼ��ls���������ļ���������Щ�ļ��������id_rsa.pub����id_dsa.pub�����ֿ��ܻͬ)��˵�����Ѿ���SSH keys�ˣ�����Խ������ӵ�����˻���
2. ���û�еĻ����㽲�õ�"No such file or directory "���������Ϣ����ʱ�����ͨ���������ɳ�����
ssh-keygen -t rsa -C "YOUR EMAIL"
��������д���email��ַ��֮��ᱻҪ����д���룬��ʱ��SSH keys�����ɺ��ˣ�����SSH Keys�������������GitHub�˻��оͿ����ˣ����˻��������ҵ�SSH keys��һ�Ȼ����дtitle��key�����ڣ����SSH Key�ͺ�GitHub�˻�����
ǰ��������ҳ���½�һ��repository����ҳ���Ϸ�������Ҫ����һЩ��Ϣ��

����Repository name��������Ȼ��ѡ�������ῴ��repository�����ӣ�

�����Ӹ�ֵ������ǰ��Xcode�У�Source Control->��һ��->Configure...��֮��ѡRemotes��

Add Remote�У�����Name���㹤�̵����֣���Address��֮ǰ�����ӵ�ַ����Ȼ��Source Control->Push��ѡ��ո��½������ӣ�Push~
����ˢ����GitHub��ҳ����Ĺ����Ѿ����ӳɹ���~��

 ����
���� 
 ����
���� 
 ����
����  ����
����  ����
���� 
 ����
���� 
 ����
���� 
 ����
����  ����
����  ����
����  ����
����  ����
���� 
 ����
����  ����
���� 
 ����
����  ����
����  ����
����  ����
���� 
 ����
����  ϲ��
ϲ��  ��
�� �ѹ�
�ѹ� ��
�� ��
�� ����
����