


工程虽然老点,但里面的各种算法还是可以使用一下,很多图像的处理算法,自己写了一个C#图像处理的例子。这个DEMO的界面的有两个PictrueBox控件,用来显示图片,一个是源图片,一个是经过转换的目标图片,UI下面部分有一些按钮,每个按钮实现一个转换功能。这个DEMO允许用户拖一张图片到源PictureBox中,然后通过这些功能按钮实现图片的效果转换。这些功能有把图片变成黑白、底片、浮雕、锐化、柔化等效果。
效果图如下:


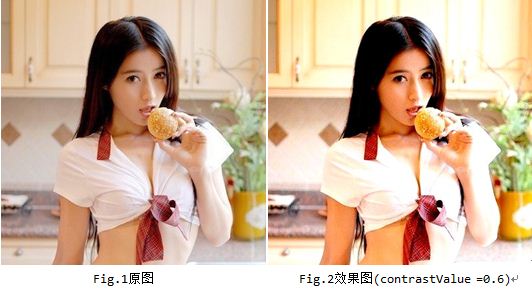


首先来一张运行效果图:

这个DEMO主要有以下几个机能点:
图像处理
PictureBox的拖拽。
计算处理时间
对图像进行缩放处理
1.图像处理
首先说明一点,图像处理的算法不是我自己的想出来的,也没有必要去想,网上调查一下,很多的。所以算法是网是找的。在些声明一下。
1.1 黑白效果
原理: 彩色图像处理成黑白效果通常有3种算法:
(1).最大值法: 使每个像素点的 R, G, B 值等于原像素点的 RGB (颜色值) 中最大的一个;
(2).平均值法: 使用每个像素点的 R,G,B值等于原像素点的RGB值的平均值;
(3).加权平均值法: 对每个像素点的 R, G, B值进行加权,R,G,B的系数分别是0.7,0.2,0.1。
自认为第三种的效果是最好的。
1.2 底片效果
原理: GetPixel方法获得每一点像素的值, 然后再使用SetPixel方法将取反后的颜色值设置到对应的点。
1.3 锐化效果
原理:突出显示颜色值大(即形成形体边缘)的像素点。
1.4 浮雕效果
原理: 对图像像素点的像素值分别与相邻像素点的像素值相减后加上128, 然后将其作为新的像素点的值。
1.5 柔化效果
原理: 当前像素点与周围像素点的颜色差距较大时取其平均值。
2.PictureBox的拖拽
拖拽是写在UserControlPictureBox类中,该类继承于UserControl,里面有一个PictrueBox,相当于把图片显示,缩放,拖拽封装了。
C#的拖拽还是很简单的。主要用到DragEnter和DragDrop事件和DoDragDrop方法。
DragEnter
在拖拽源被拖入到拖拽目标时触发,在这个事件处理函数中,要做的事情就是设置DragEventArgs 对象的Effect,这是一个DragDropEffects枚举值。具体请参见MSDN。
DragDrop
在释放鼠标并且鼠标拖拽目标之内在时发生。这里面可以接受拖拽的数据。
DoDragDrop
这个函数表示开始一个拖拽事件,一般是在MouseDown或者MouseMove中调用这个函数,这个函数会阻塞线程。
3.计算处理时间
这部分主要用到了QueryPerformanceCounter 和 QueryPerformanceFrequency API。这里会涉及到API与C#交互的问题。代码如下:
[csharp] view plaincopy
[DllImport("kernel32.dll")]
private static extern bool QueryPerformanceCounter(ref long lpPerformanceCount);
[DllImport("kernel32.dll")]
private static extern bool QueryPerformanceFrequency(ref long lpFrequency);
4.对图像进行缩放处理
这部分是也是写在UserControlPictureBox类中。由于用户拖入的图片尺寸可能很大,显示在PictrueBox中虽说可以进行缩放显示,但得到的Image对象还是原来图片你的尺寸,所以为了提高转换效率,就要对图片进行等比例缩放。核心代码如下:
[cpp] view plaincopy
Bitmap bitmap = new Bitmap(newWidth, newHeight, oldImage.PixelFormat);
Graphics g = Graphics.FromImage(bitmap);
g.Clear(Color.Transparent);
g.DrawImage(oldImage, new RectangleF(0, 0, newWidth, newHeight));
return Image.FromHbitmap(bitmap.GetHbitmap());
其中newWidth, newHeight是新的图片的尺寸,这两个值的得到很简单。
5.总体说明
界面上有很多按钮,其实每个按钮的事件处理程序都是一个,我在程序中定义了一个枚举:
[csharp] view plaincopy
public enum ImageEffect
{
GrayScale = 0, // 黑白
Film = 1, // 底片
Relief = 2, // 浮雕
Soften = 3, // 柔化
Sharpen = 4, // 锐化
Canvas = 5, // 油画
}
在按钮处理程序中根据不同的按钮ID,给ImageEffectManager类的ChangeEffect方法传递不同的参数。
一、各种旋转、改变大小
注意:先要添加画图相关的using引用。
//向右旋转图像90°代码如下:
private void Form1_Paint(object sender, System.Windows.Forms.PaintEventArgs e)
{
Graphics g = e.Graphics;
Bitmap bmp = new Bitmap("rama.jpg");//加载图像
g.FillRectangle(Brushes.White, this.ClientRectangle);//填充窗体背景为白色
Point[] destinationPoints = {
new Point(100, 0), // destination for upper-left point of original
new Point(100, 100),// destination for upper-right point of original
new Point(0, 0)}; // destination for lower-left point of original
g.DrawImage(bmp, destinationPoints);
}
//旋转图像180°代码如下:
private void Form1_Paint(object sender, System.Windows.Forms.PaintEventArgs e)
{
Graphics g = e.Graphics;
Bitmap bmp = new Bitmap("rama.jpg");
g.FillRectangle(Brushes.White, this.ClientRectangle);
Point[] destinationPoints = {
new Point(0, 100), // destination for upper-left point of original
new Point(100, 100),// destination for upper-right point of original
new Point(0, 0)}; // destination for lower-left point of original
g.DrawImage(bmp, destinationPoints);
}
//图像切变代码:
private void Form1_Paint(object sender, System.Windows.Forms.PaintEventArgs e)
{
Graphics g = e.Graphics;
Bitmap bmp = new Bitmap("rama.jpg");
g.FillRectangle(Brushes.White, this.ClientRectangle);
Point[] destinationPoints = {
new Point(0, 0), // destination for upper-left point of original
new Point(100, 0), // destination for upper-right point of original
new Point(50, 100)};// destination for lower-left point of original
g.DrawImage(bmp, destinationPoints);
}
//图像截取:
private void Form1_Paint(object sender, System.Windows.Forms.PaintEventArgs e)
{
Graphics g = e.Graphics;
Bitmap bmp = new Bitmap("rama.jpg");
g.FillRectangle(Brushes.White, this.ClientRectangle);
Rectangle sr = new Rectangle(80, 60, 400, 400);//要截取的矩形区域
Rectangle dr = new Rectangle(0, 0, 200, 200);//要显示到Form的矩形区域
g.DrawImage(bmp, dr, sr, GraphicsUnit.Pixel);
}
//改变图像大小:
private void Form1_Paint(object sender, System.Windows.Forms.PaintEventArgs e)
{
Graphics g = e.Graphics;
Bitmap bmp = new Bitmap("rama.jpg");
g.FillRectangle(Brushes.White, this.ClientRectangle);
int width = bmp.Width;
int height = bmp.Height;
// 改变图像大小使用低质量的模式
g.InterpolationMode = InterpolationMode.NearestNeighbor;
g.DrawImage(bmp, new Rectangle(10, 10, 120, 120), // source rectangle
new Rectangle(0, 0, width, height), // destination rectangle
GraphicsUnit.Pixel);
// 使用高质量模式
//g.CompositingQuality = CompositingQuality.HighSpeed;
g.InterpolationMode = InterpolationMode.HighQualityBicubic;
g.DrawImage(
bmp,
new Rectangle(130, 10, 120, 120),
new Rectangle(0, 0, width, height),
GraphicsUnit.Pixel);
}
//设置图像的分辩率:
private void Form1_Paint(object sender, System.Windows.Forms.PaintEventArgs e)
{
Graphics g = e.Graphics;
Bitmap bmp = new Bitmap("rama.jpg");
g.FillRectangle(Brushes.White, this.ClientRectangle);
bmp.SetResolution(300f, 300f);
g.DrawImage(bmp, 0, 0);
bmp.SetResolution(1200f, 1200f);
g.DrawImage(bmp, 180, 0);
}
//用GDI+画图
private void Form1_Paint(object sender, System.Windows.Forms.PaintEventArgs e)
{
Graphics gForm = e.Graphics;
gForm.FillRectangle(Brushes.White, this.ClientRectangle);
for (int i = 1; i <= 7; ++i)
{
//在窗体上面画出橙色的矩形
Rectangle r = new Rectangle(i*40-15, 0, 15,
this.ClientRectangle.Height);
gForm.FillRectangle(Brushes.Orange, r);
}
//在内存中创建一个Bitmap并设置CompositingMode
Bitmap bmp = new Bitmap(260, 260,
System.Drawing.Imaging.PixelFormat.Format32bppArgb);
Graphics gBmp = Graphics.FromImage(bmp);
gBmp.CompositingMode = System.Drawing.Drawing2D.CompositingMode.SourceCopy;
// 创建一个带有Alpha的红色区域
// 并将其画在内存的位图里面
Color red = Color.FromArgb(0x60, 0xff, 0, 0);
Brush redBrush = new SolidBrush(red);
gBmp.FillEllipse(redBrush, 70, 70, 160, 160);
// 创建一个带有Alpha的绿色区域
Color green = Color.FromArgb(0x40, 0, 0xff, 0);
Brush greenBrush = new SolidBrush(green);
gBmp.FillRectangle(greenBrush, 10, 10, 140, 140);
//在窗体上面画出位图 now draw the bitmap on our window
gForm.DrawImage(bmp, 20, 20, bmp.Width, bmp.Height);
// 清理资源
bmp.Dispose();
gBmp.Dispose();
redBrush.Dispose();
greenBrush.Dispose();
}
//在窗体上面绘图并显示图像
private void Form1_Paint(object sender, System.Windows.Forms.PaintEventArgs e)
{
Graphics g = e.Graphics;
Pen blackPen = new Pen(Color.Black, 1);
if (ClientRectangle.Height / 10 > 0)
{
for (int y = 0; y < ClientRectangle.Height; y += ClientRectangle.Height / 10)
{
g.DrawLine(blackPen, new Point(0, 0), new Point(ClientRectangle.Width, y));
}
}
blackPen.Dispose();
}
C# 使用Bitmap类进行图片裁剪
在Mapwin(手机游戏地图编辑器)生成的地图txt文件中添加自己需要处理的数据后转换成可在手机(Ophone)开发环境中使用的字节流地图文件的小工具,其中就涉及到图片的裁剪和生成了。有以下几种方式。
方法一:拷贝像素。
当然这种方法是最笨的,效率也就低了些。
在Bitmap类中我们可以看到这样两个方法:GetPixel(int x, int y)和SetPixel(int x, int y, Color color)方法。从字面的含以上就知道前者是获取图像某点像素值,是用Color对象返回的;后者是将已知像素描画到制定的位置。
下面就来做个实例检验下:
1.首先创建一个Windows Form窗体程序,往该窗体上拖放7个PictureBox控件,第一个用于放置并显示原始的大图片,其后6个用于放置并显示裁剪后新生成的6个小图;
2.放置原始大图的PictureBox控件name属性命名为pictureBoxBmpRes,其后pictureBox1到pictureBox6依次命名,并放置在合适的位置;
3.双击Form窗体,然后在Form1_Load事件中加入下面的代码即可。
//导入图像资源
Bitmap bmpRes = null;
String strPath = Application.ExecutablePath;
try{
int nEndIndex = strPath.LastIndexOf('//');
strPath = strPath.Substring(0,nEndIndex) + "//Bmp//BmpResMM.bmp";
bmpRes = new Bitmap(strPath);
//窗体上显示加载图片
pictureBoxBmpRes.Width = bmpRes.Width;
pictureBoxBmpRes.Height = bmpRes.Height;
pictureBoxBmpRes.Image = bmpRes;
}
catch(Exception ex)
{
System.Windows.Forms.MessageBox.Show("图片资源加载失败!/r/n" + ex.ToString());
}
//裁剪图片(裁成2行3列的6张图片)
int nYClipNum = 2, nXClipNum = 3;
Bitmap[] bmpaClipBmpArr = new Bitmap[nYClipNum * nXClipNum];
for (int nYClipNumIndex = 0; nYClipNumIndex < nYClipNum; nYClipNumIndex++)
{
for (int nXClipNumIndex = 0; nXClipNumIndex < nXClipNum; nXClipNumIndex++)
{
int nClipWidth = bmpRes.Width / nXClipNum;
int nClipHight = bmpRes.Height / nYClipNum;
int nBmpIndex = nXClipNumIndex + nYClipNumIndex * nYClipNum + (nYClipNumIndex > 0?1:0);
bmpaClipBmpArr[nBmpIndex] = new Bitmap(nClipWidth, nClipHight);
for(int nY = 0; nY < nClipHight; nY++)
{
for(int nX = 0; nX < nClipWidth; nX++)
{
int nClipX = nX + nClipWidth * nXClipNumIndex;
int nClipY = nY + nClipHight * nYClipNumIndex;
Color cClipPixel = bmpRes.GetPixel(nClipX, nClipY);
bmpaClipBmpArr[nBmpIndex].SetPixel(nX, nY, cClipPixel);
}
}
}
}
PictureBox[] picbShow = new PictureBox[nYClipNum * nXClipNum];
picbShow[0] = pictureBox1;
picbShow[1] = pictureBox2;
picbShow[2] = pictureBox3;
picbShow[3] = pictureBox4;
picbShow[4] = pictureBox5;
picbShow[5] = pictureBox6;
for (int nLoop = 0; nLoop < nYClipNum * nXClipNum; nLoop++)
{
picbShow[nLoop].Width = bmpRes.Width / nXClipNum;
picbShow[nLoop].Height = bmpRes.Height / nYClipNum;
picbShow[nLoop].Image = bmpaClipBmpArr[nLoop];
}
现在看看那些地方需要注意的了。其中
int nBmpIndex =
nXClipNumIndex + nYClipNumIndex * nYClipNum + (nYClipNumIndex > 0?1:0);
这句定义了存储裁剪图片对象在数组中的索引,需要注意的就是后面的(nYClipNumIndex > 0?1:0)――因为只有当裁剪的对象处于第一行以外的行时需要将索引加1;
另外,因为这种方法的效率不高,程序运行起来还是顿了下。如果有兴趣的话,可以将以上的代码放到一个按钮Click事件函数中,当单击该按钮时就可以感觉到了。
方法二:运用Clone函数局部复制。
同样在Bitmap中可以找到Clone()方法,该方法有三个重载方法。Clone(),Clone(Rectangle, PixelFormat)和Clone(RectangleF, PixelFormat)。第一个方法将创建并返回一个精确的实例对象,后两个就是我们这里需要用的局部裁剪了(其实后两个方法本人觉得用法上差不多)。
将上面的程序稍稍改进下――将裁剪的处理放到一个按钮事件函数中,然后再托一个按钮好窗体上,最后将下面的代码复制到该按钮的事件函数中。
for (int nYClipNumIndex = 0; nYClipNumIndex < nYClipNum; nYClipNumIndex++)
{
for (int nXClipNumIndex = 0; nXClipNumIndex < nXClipNum; nXClipNumIndex++)
{
int nClipWidth = bmpRes.Width / nXClipNum;
int nClipHight = bmpRes.Height / nYClipNum;
int nBmpIndex =
nXClipNumIndex + nYClipNumIndex * nYClipNum + (nYClipNumIndex > 0 ? 1 : 0);
Rectangle rClipRect = new Rectangle(nClipWidth * nXClipNumIndex,
nClipHight * nYClipNumIndex,
nClipWidth,
nClipHight);
bmpaClipBmpArr[nBmpIndex] = bmpRes.Clone(rClipRect, bmpRes.PixelFormat);
}
}
运行程序,单击按钮检验下,发现速度明显快可很多。
其实这种方法较第一中方法不同的地方仅只是变换了for循环中的拷贝部分的处理,
Rectangle rClipRect = new Rectangle(nClipWidth * nXClipNumIndex,
nClipHight * nYClipNumIndex,
nClipWidth,
nClipHight);
bmpaClipBmpArr[nBmpIndex] = bmpRes.Clone(rClipRect, bmpRes.PixelFormat);
各种效果:
一. 底片效果
原理: GetPixel方法获得每一点像素的值, 然后再使用SetPixel方法将取反后的颜色值设置到对应的点.
效果图:

代码实现:
private void button1_Click(object sender, EventArgs e)
{
//以底片效果显示图像
try
{
int Height = this.pictureBox1.Image.Height;
int Width = this.pictureBox1.Image.Width;
Bitmap newbitmap = new Bitmap(Width, Height);
Bitmap oldbitmap = (Bitmap)this.pictureBox1.Image;
Color pixel;
for (int x = 1; x < Width; x++)
{
for (int y = 1; y < Height; y++)
{
int r, g, b;
pixel = oldbitmap.GetPixel(x, y);
r = 255 - pixel.R;
g = 255 - pixel.G;
b = 255 - pixel.B;
newbitmap.SetPixel(x, y, Color.FromArgb(r, g, b));
}
}
this.pictureBox1.Image = newbitmap;
}
catch (Exception ex)
{
MessageBox.Show(ex.Message, "信息提示", MessageBoxButtons.OK, MessageBoxIcon.Information);
}
}
二. 浮雕效果
原理: 对图像像素点的像素值分别与相邻像素点的像素值相减后加上128, 然后将其作为新的像素点的值.
效果图:

代码实现:
private void button1_Click(object sender, EventArgs e)
{
//以浮雕效果显示图像
try
{
int Height = this.pictureBox1.Image.Height;
int Width = this.pictureBox1.Image.Width;
Bitmap newBitmap = new Bitmap(Width, Height);
Bitmap oldBitmap = (Bitmap)this.pictureBox1.Image;
Color pixel1, pixel2;
for (int x = 0; x < Width - 1; x++)
{
for (int y = 0; y < Height - 1; y++)
{
int r = 0, g = 0, b = 0;
pixel1 = oldBitmap.GetPixel(x, y);
pixel2 = oldBitmap.GetPixel(x + 1, y + 1);
r = Math.Abs(pixel1.R - pixel2.R + 128);
g = Math.Abs(pixel1.G - pixel2.G + 128);
b = Math.Abs(pixel1.B - pixel2.B + 128);
if (r > 255)
r = 255;
if (r < 0)
r = 0;
if (g > 255)
g = 255;
if (g < 0)
g = 0;
if (b > 255)
b = 255;
if (b < 0)
b = 0;
newBitmap.SetPixel(x, y, Color.FromArgb(r, g, b));
}
}
this.pictureBox1.Image = newBitmap;
}
catch (Exception ex)
{
MessageBox.Show(ex.Message, "信息提示", MessageBoxButtons.OK, MessageBoxIcon.Information);
}
}
三. 黑白效果
原理: 彩色图像处理成黑白效果通常有3种算法;
(1).最大值法: 使每个像素点的 R, G, B 值等于原像素点的 RGB (颜色值) 中最大的一个;
(2).平均值法: 使用每个像素点的 R,G,B值等于原像素点的RGB值的平均值;
(3).加权平均值法: 对每个像素点的 R, G, B值进行加权
---自认为第三种方法做出来的黑白效果图像最 "真实".
效果图:

代码实现:
private void button1_Click(object sender, EventArgs e)
{
//以黑白效果显示图像
try
{
int Height = this.pictureBox1.Image.Height;
int Width = this.pictureBox1.Image.Width;
Bitmap newBitmap = new Bitmap(Width, Height);
Bitmap oldBitmap = (Bitmap)this.pictureBox1.Image;
Color pixel;
for (int x = 0; x < Width; x++)
for (int y = 0; y < Height; y++)
{
pixel = oldBitmap.GetPixel(x, y);
int r, g, b, Result = 0;
r = pixel.R;
g = pixel.G;
b = pixel.B;
//实例程序以加权平均值法产生黑白图像
int iType =2;
switch (iType)
{
case 0://平均值法
Result = ((r + g + b) / 3);
break;
case 1://最大值法
Result = r > g ? r : g;
Result = Result > b ? Result : b;
break;
case 2://加权平均值法
Result = ((int)(0.7 * r) + (int)(0.2 * g) + (int)(0.1 * b));
break;
}
newBitmap.SetPixel(x, y, Color.FromArgb(Result, Result, Result));
}
this.pictureBox1.Image = newBitmap;
}
catch (Exception ex)
{
MessageBox.Show(ex.Message, "信息提示");
}
}
四. 柔化效果
原理: 当前像素点与周围像素点的颜色差距较大时取其平均值.
效果图:

代码实现:
private void button1_Click(object sender, EventArgs e)
{
//以柔化效果显示图像
try
{
int Height = this.pictureBox1.Image.Height;
int Width = this.pictureBox1.Image.Width;
Bitmap bitmap = new Bitmap(Width, Height);
Bitmap MyBitmap = (Bitmap)this.pictureBox1.Image;
Color pixel;
//高斯模板
int[] Gauss ={ 1, 2, 1, 2, 4, 2, 1, 2, 1 };
for (int x = 1; x < Width - 1; x++)
for (int y = 1; y < Height - 1; y++)
{
int r = 0, g = 0, b = 0;
int Index = 0;
for (int col = -1; col <= 1; col++)
for (int row = -1; row <= 1; row++)
{
pixel = MyBitmap.GetPixel(x + row, y + col);
r += pixel.R * Gauss[Index];
g += pixel.G * Gauss[Index];
b += pixel.B * Gauss[Index];
Index++;
}
r /= 16;
g /= 16;
b /= 16;
//处理颜色值溢出
r = r > 255 ? 255 : r;
r = r < 0 ? 0 : r;
g = g > 255 ? 255 : g;
g = g < 0 ? 0 : g;
b = b > 255 ? 255 : b;
b = b < 0 ? 0 : b;
bitmap.SetPixel(x - 1, y - 1, Color.FromArgb(r, g, b));
}
this.pictureBox1.Image = bitmap;
}
catch (Exception ex)
{
MessageBox.Show(ex.Message, "信息提示");
}
}
五.锐化效果
原理:突出显示颜色值大(即形成形体边缘)的像素点.
效果图:

实现代码:
private void button1_Click(object sender, EventArgs e)
{
//以锐化效果显示图像
try
{
int Height = this.pictureBox1.Image.Height;
int Width = this.pictureBox1.Image.Width;
Bitmap newBitmap = new Bitmap(Width, Height);
Bitmap oldBitmap = (Bitmap)this.pictureBox1.Image;
Color pixel;
//拉普拉斯模板
int[] Laplacian ={ -1, -1, -1, -1, 9, -1, -1, -1, -1 };
for (int x = 1; x < Width - 1; x++)
for (int y = 1; y < Height - 1; y++)
{
int r = 0, g = 0, b = 0;
int Index = 0;
for (int col = -1; col <= 1; col++)
for (int row = -1; row <= 1; row++)
{
pixel = oldBitmap.GetPixel(x + row, y + col); r += pixel.R * Laplacian[Index];
g += pixel.G * Laplacian[Index];
b += pixel.B * Laplacian[Index];
Index++;
}
//处理颜色值溢出
r = r > 255 ? 255 : r;
r = r < 0 ? 0 : r;
g = g > 255 ? 255 : g;
g = g < 0 ? 0 : g;
b = b > 255 ? 255 : b;
b = b < 0 ? 0 : b;
newBitmap.SetPixel(x - 1, y - 1, Color.FromArgb(r, g, b));
}
this.pictureBox1.Image = newBitmap;
}
catch (Exception ex)
{
MessageBox.Show(ex.Message, "信息提示");
}
}
六. 雾化效果
原理: 在图像中引入一定的随机值, 打乱图像中的像素值
效果图:

实现代码:
private void button1_Click(object sender, EventArgs e)
{
//以雾化效果显示图像
try
{
int Height = this.pictureBox1.Image.Height;
int Width = this.pictureBox1.Image.Width;
Bitmap newBitmap = new Bitmap(Width, Height);
Bitmap oldBitmap = (Bitmap)this.pictureBox1.Image;
Color pixel;
for (int x = 1; x < Width - 1; x++)
for (int y = 1; y < Height - 1; y++)
{
System.Random MyRandom = new Random();
int k = MyRandom.Next(123456);
//像素块大小
int dx = x + k % 19;
int dy = y + k % 19;
if (dx >= Width)
dx = Width - 1;
if (dy >= Height)
dy = Height - 1;
pixel = oldBitmap.GetPixel(dx, dy);
newBitmap.SetPixel(x, y, pixel);
}
this.pictureBox1.Image = newBitmap;
}
catch (Exception ex)
{
MessageBox.Show(ex.Message, "信息提示");
}
}

 下载
下载  下载
下载  下载
下载  下载
下载  下载
下载  VSPD虚拟串口6.9 汉化版
  VS2010~2015番茄助手VA_X2073 支持vs2015亲测可用
  终端仿真器 SecureCRTv7.1.1.264 最新版
  jQuery 1.9.1 正式版
  串口调试小助手1.3 免费版
  小旋风ASP服务器安装版
  CRYSTAL REPORTS 2008 (水晶报表2008)官方简体中文版 CR开发人员版
  WinHex 十六进制编辑器v19.8 绿色中文注册版
  16进制转换工具V1.0 中文绿色版
  github离线安装包V1.0.6 官方最新版(github desktop)
  visual studio 2015离线版官方完整版
  Adobe AIRV32.0.0.83 官方最新版
  MSDN Library Visual Studio 6.0(VC、VB、VF、VJ)中文版win32开发人员必备
  Memory Analyzer (MAT)V1.01 免费绿色版
  .NETv3.0 可再发行组件包
  IBM内存检测工具(IBM Thread and Monitor Dump Analyzer for Java)V4.3.3 绿色版
  版本控制软件(SourceTree)v2.6.10官方最新版